This webpage introduces SEA’s scheme to loan its thermal imaging camera to members, and provides information on how to use the camera …
October 2022, updated November 2026
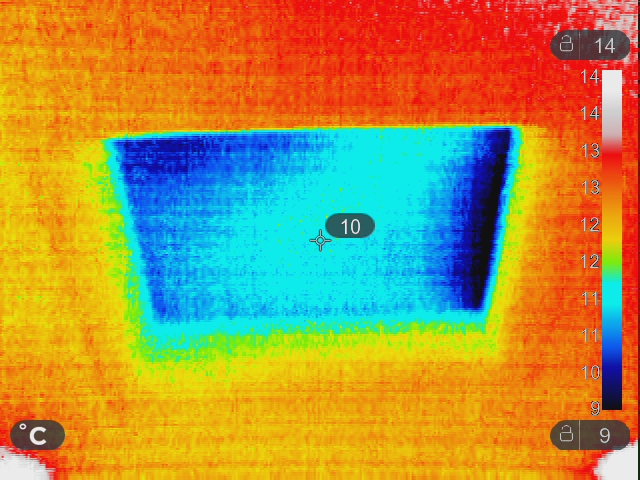
SEA’s
THERMAL IMAGING CAMERA
SEA invited Dr Tim Jones of Community Energy Plus to give a review on reducing the carbon footprint of your home, in October 2022. His presentation was entitled ‘Futureproofing your Home’ and his slides can be seen here
Introduction to our thermal imaging camera
On a cold Winter’s evening, your home is likely to need some form of heating if you want to be comfortable. But heating your home costs money and releases greenhouse gases. Sadly, this heat is soon lost and your house cools down again overnight. By finding out where the heat loss occurs, and stopping it, you can save money and reduce your carbon footprint – but still keep warm.
A thermal imaging camera captures infrared light, which is given off by objects according to their temperature. Infrared light is not visible to the human eye, but is shown in colour on the camera screen – hot objects appear red and cold objects appear blue. A thermal image of the outside of your house can show red where your heat is escaping, while images taken inside can show blue where the cold is getting in.
While it can be easy to find spots where the heat escapes, it is not always easy to work out exactly why, and what you can do about it. Every house is different, and while we can point out some general principles and suggest some DiY fixes, sometimes professional advice is needed to fully interpret the cold spots and advise you how to fix them.
Draughts and ventilation
It is worth remembering that draughts often cause as much as half the heat loss from a house! So stopping draughts is often an easy way to keep your house warm.
Draughts and ventilation Draughts represent uncontrolled exchange of air inside and outside. It important to remember that some controlled ventilation is vital to remove excess humidity (steam/water vapour) and pollutants. So while you should aim to stop up the small holes around the windows that cause draughts all day and night, you should be aware of, and deal with, the humidity and pollutants.
There are two aspects to think of – dealing with short-term increases in steam, and dealing with everyday household moisture and pollutants. Cooking, showering and drying clothes produce large amounts of steam that needs to be extracted by a fan or open window, during and for at least 10-15 minutes after. Everyday household moisture (from skin and breath) and pollutants (from chemicals, furniture etc) are best extracted daily by opening windows on both sides of a house to create a through draft for just 10 minutes. Then close the windows. This method avoids any great loss of the heat stored in walls and furniture resulting in lower temperature, which happens when a window is left open all day.
SEA’s Thermal Camera Loan Scheme
SEA has bought a Seek ‘SHOTPRO’ thermal imaging camera, to loan out to SEA members to learn about heat loss in their homes. There is no fixed charge, but a donation to SEA (suggested £10) would be appreciated and will help us save towards a second camera.
Please apply for the camera by emailing info@seasaltash.org.uk. You will be asked to collect the camera from one of the team, and deliver it back after 2 weeks. You may be able to extend the loan period, for example if the weather is not cold enough to make meaningful images, and depending on demand from other members. Please contact us at the same email address.
We will ask you to provide your name, address and contact details on a Camera Loan Form. This information will be used to contact you if necessary, and not for any other purpose, and will be destroyed when you return the camera.
SEA is pleased to offer this loan service to its members. The camera was funded partly by Cornwall Community Trust and partly by individual donations to SEA, and we are grateful to all who have contributed
Information on using the camera
There are currently 4 sections here:
- Getting started
- More advanced operations, comments and tips
- When, where and how to use the camera
- What next?
Getting started
It only takes a few steps to start exploring your home, and you can do no harm!
Here are the basic camera controls.
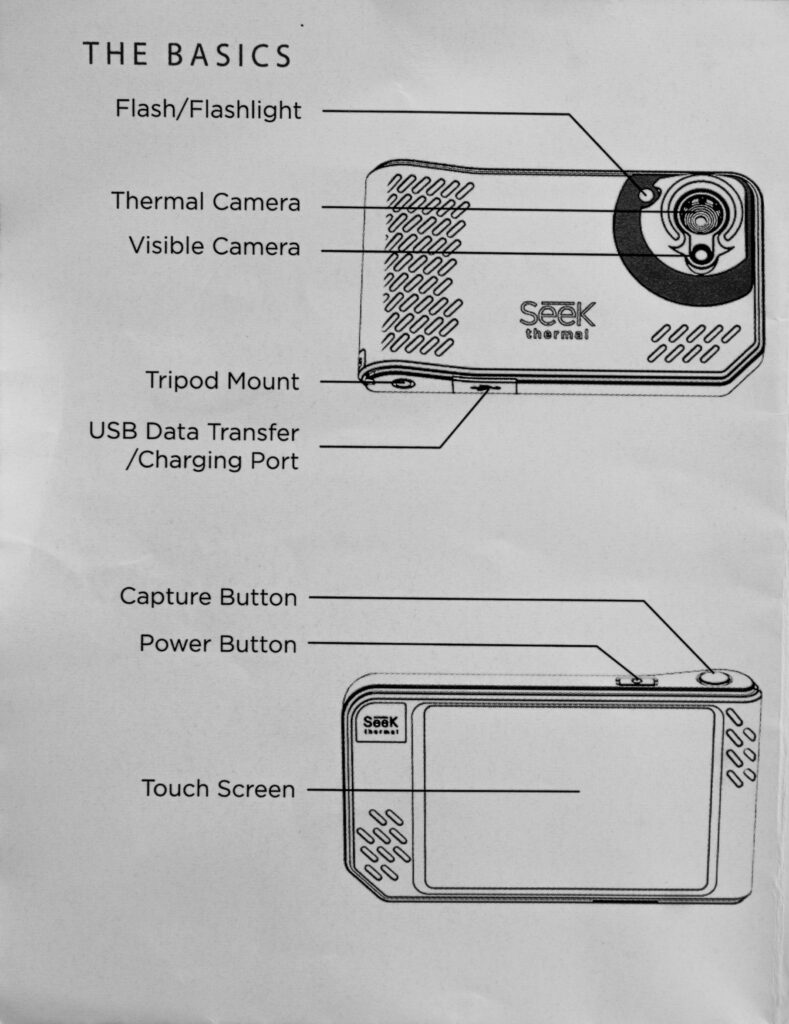
STEP 1 Switching on
The camera will usually be supplied fully charged. Recharge it when necessary, using the USB cable and a standard charging plug.
Hold the camera firmly at the LH bottom corner and please use the safety strap on your other wrist.
Turn on the camera using the Power button located at the top of the camera. Press and hold for 2-3 seconds.
After a short pause, you will see the Start screen.

finger poised over the Capture button
STEP 2 Two basic screens
First check the battery icon in the top RH corner of the Start screen. Ignore the other icons for the moment.
Tap the screen to switch between the Start and Viewing screens. The Viewing screen shows more, without the upper and lower bands of icons.
Note just the central spot temperature, and the temperature bar on the RH side.
Spend time looking at different objects.
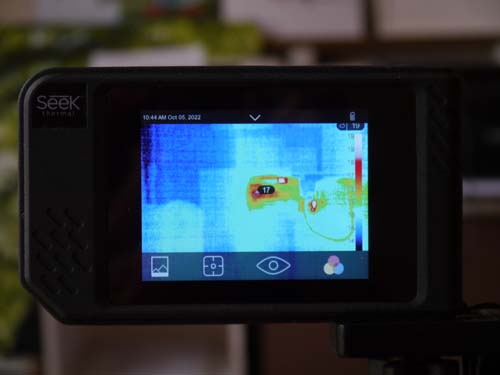
STEP 3 Taking a photo
Use a short press and release of the Capture button to capture an image and save it to the camera’s gallery.
Please note that a standard digital photo is saved at the same time (if the light level is adequate) and can be examined later. Unwanted images can easily be deleted.
STEP 3b Recording a video
Use a long press of the Capture button to begin a video recording; release the Capture button while capturing your video. To end the recording, press and release the Capture button again. Your video will be automatically saved to the camera’s gallery. Videos seem to be of more value to the professional than amateur user.
STEP 4 Looking at your stored photos and videos
Tap the screen to show the Start screen, then tap the ‘mountains’ or gallery icon, bottom LH corner. Arrows on each side allow you to move between images. You will probably see lots of images recorded by other users. Press (not tap) the X to return to the Start screen, and then tap ‘OK’.

Now spend time looking around inside your house, particularly the windows, doors and ceiling, to gain experience in using the camera to look for cold areas showing heat loss. You will probably find it useful to spend more time learning how to analyse your saved photos, described below in ‘More advanced operations’. This will help you better decide how to approach a systematic examination of the whole house.
Please note: we have found that the camera reads 1℃ higher when you hold it closer to the object, within about 1 meter.
Some of the camera controls seem to operate swiftly, others take much longer. For example, switching off can be a slow process: even after holding the button down, and there is further delay after confirming ‘OK’. This seems to be nothing to worry about.
Click here it you want to go straight to When where and how to use the camera
More advanced operations

The camera is basically straightforward to operate, but it also has some advanced options that can be explored through the ‘mountains’, ‘point’, ‘eye’ and ‘palette’ icons.
These can help you get more detailed information from the photos you have saved. And you can use these options to provide more information actually when you are examining your house.
For example, it can be good to use the ‘Eye’ icon to select a combination of light/infrared camera so you can more easily see exactly where you are. And adding 3 measuring Points can give a better overall impression of temperature differences.
The manufacturer’s short videos on use and controls are brief and clear, and can be accessed if you go to the very bottom of this webpage:
https://www.thermal.com/seekshot-series.html
There is also a support page with more information and further articles. Just follow ‘Seek Shot Series’ on this page:
https://support.thermal.com/hc/en-us
In case you don’t have access to these videos, in this section we briefly describe:
- Deleting photos and videos
- Exploring detail through the other Start screen icons – this applies both to View screen, and to looking at your stored photos
- Downloading photos to your computer
- Feedback, tips and cautions
Deleting photos and videos
On the Start screen, tap the mountains icon, find any photo you want to delete, tap the Dustbin icon, and confirm with Yes. Tap X to go back to the Start screen.
Exploring detail in photos: (this ALSO applies to the Viewing Screen, see below)
On the Start screen, tap the mountains icon, then tap the pencil. Three icons offer different menus to explore
‘Point’ temperature icon
- The default option is a single central measurement point. Explore other settings, but please leave the camera on this setting when you return it
- Up to 3 separate points can be shown and each one dragged to an area of interest. This can reveal the actual temperature difference between different objects, to help assess whether it is significant
- Up to 3 separate areas can be shown, with average temperature, and again these can be dragged around the screen, and enlarged by pulling a corner
- The maximum and minimum temperatures on your image can be shown
‘Eye’ icon – thermal and light images
The camera shows the infrared (thermal) image by default. This is represented by the dotted eye.
The complete eye shows the standard photo. If you want to keep this version, to download later, then you must Save as Copy.
The combined eye shows both, and the balance between them is adjusted using the slider on the LH side.
Colour palette icon
- This offers different colour ranges that you can use to represent hot and cold in different circumstances. For example, in viewing the exterior of your house, you could try the palettes on the RH end of the range.
Please leave the camera back on the furthest LH one, as default.
Editing your photo: afterwards, you have to choose whether to save your edited photo, or just exit. To save, tap the tick. You have the choice of replacing the original or saving as a new copy.
Exit When you have finished, press X to exit to the Start screen.
Icons at the top of the screen
The icons at the top of the screen offer yet more advanced options. You are welcome to press the down arrow and explore the options and settings, but please leave the camera settings the way you found them.
Downloading photos to your desktop
You can download your photos to a PC (Windows) or Mac computer, using the USB lead.
Only the thermal image is downloaded; if you want to keep the standard light image, make a separate copy of it on the camera first (by using the Eye icon, see above), then download that.
Windows PC download
- Have your computer switched on, and connect the camera using the USB lead supplied (it’s a non-standard C lead)
- Switch on the camera > ‘USB connected’ > click OK
- This should open up ‘File Manager’ on your PC: select the Photos or Video folder
- Your photos will probably be at the end of the list
- View ‘Large icons’ or play through all using Photos to select which you want to transfer
- Drag or copy/paste to your computer (probably easiest using two side-by-side copies of File Manager)
- Make any notes on interpretation that you need while the memory is fresh!
- And finally, please delete any photos that aren’t likely to be useful to other people
Remember that the camera will switch itself off after a set time, so may need to be restarted to continue the process.
To download to a Mac computer, connect USB lead and use Finder to select and open drive.
When finished, switch off the camera and remove the lead.
The camera will be recharged while connected to your computer, but only slowly. And we have met the situation where the camera battery was completely drained while connected to the computer – presumably when the computer hibernated. This was concerning as the camera failed to respond to any command – but recovered after being recharged using a standard recharging plug.
On another occasion, while connected to the PC the flashlight turned itself on, irretrievably; the camera had to be disconnected from the PC, no harm done.
Feedback, tips and cautions
The following general tips are based on information provided elsewhere, including the following:
Misinterpreting Images: while viewing your property, you will likely see cold spots, hot spots, and patterns that might not make sense and aren’t entirely easy to interpret. It is important to remember that not all cold or hot spots are problems, for example some ‘cold’ ventilation spots (such as air-bricks) may be important for health and safety. So be cautious before making a judgement.
Even well-functioning double-glazed windows appear colder at the lower margins
Temperature Measurement Errors: The thermal imaging camera is only accurate within +/- 2℃. It has been found to read 3℃ lower compared with a DiY contact thermometer, and with a supermarket Infrared temperature monitor.
However, importantly, the temperature reading depends on the distance from the object! If you move closer than about 1 meter, the reading rises by about 1℃.
Also, it’s easy to be misled when it comes to comparing temperature readings of two objects with different surfaces. Be aware that the temperature of shiny objects, like polished metal, will not be accurately measured by your thermal image due to their low emissivity (in relation to, say, wood) – therefore two objects side-by-side may appear to be at different temperatures! In practice, we have not found this to be a significant problem in domestic situations.
Know the limitations of the camera: Certain applications, such as detecting moisture issues with thermal imaging, will require a higher-performance camera that can detect very subtle temperature differences.
Click here to go back to More advanced operations
Advice on when, where and how to use the camera in the home
When
Heat losses show up best when the house is at least 10℃ warmer than the outside air.
Ideally, measure the temperature with a thermometer. For approximate readings, you could use the weather feature of your mobile phone for the outside; or use the camera to compare the temperatures of a wall inside and a wall outside.
The outside temperature is lower in the morning and evening, and usually lowest of all in the early morning, just before dawn.
January and February offer best chances of low outside temperatures, but cold days in Autumn or Spring may well be as low as 8℃, while the indoor temperature is likely to be 18℃ or more.
Switching on the home heating on a cold day is likely to produce a temperature difference much greater than 10℃, and so show up heat loss more clearly, both from inside and outside the house. Switching on the heating will of course give you a chance to look at the efficiency of your heating system itself.
Windy weather is useful for identifying draughts, and smoke from a joss stick can sometimes show them more clearly than the camera.
Where and how
For a reasonably complete review of your house, you might need to use three approaches.
1) inside the house, look for cold spots – they indicate heat loss through windows & doors, walls, roof and floor in turn;
2) look specifically at your heating system itself, to check for wasted heat; and
3) outside the house, look for hot spots where heat escapes.
We describe each of these in turn.
One word of warning: different surfaces radiate heat differently. They may actually be at the same temperature but APPEAR to be different temperatures on thermal imaging. (This is to do with ‘emissivity’ of different surfaces, in case you want to explore the subject.) So be slightly cautious about drawing conclusions from comparing two objects.
Inside the house
- WINDOWS
You may notice a reflected thermal image of yourself in the window.
Even modern, ‘A’ rated double-glazed windows lose much more heat than an insulated wall, per square meter. Find out how a well fitting blind or curtains can reduce your heat loss.
The thermal camera cannot measure the temperatures of glass. But it can measure dull black electrical tape stuck onto the window pane. Windows that have lost their seal will be colder.
Look around the edges of windows and doors (front and back) for evidence of draughts. Sometimes you can feel a draught with your hand or face, or see evidence of it with smoke (e.g. from a taper or joss-stick).
Confirmed draughts need the gaps closed with an appropriate filler. But remember that controlled ventilation (with extractor fan or open window) is essential in rooms with excessive water vapour, such as bathrooms, utility and kitchens.
- DOORS
As with windows above, you are looking for draughts around the door and the letterbox, as well as heat loss directly through the fabric of the door itself
- OTHER OPENINGS AND HOLES IN WALLS
Look for where any pipes pass through walls forming heat bridges; or any wires pass through and the holes around them have not been filled properly.
- THE WALL ITSELF
Within a room, compare the temperature of an internal wall with that of an outside wall: but not close to any heating appliance. Any difference will be due mainly to heat loss directly through the outside wall, which is determined by its insulation.
Cold areas in a wall can indicate ‘bridging’ where heat escapes directly through the wall, perhaps along a metal structure continuous between inside and out. Cold areas might also indicate cracks in the wall.
Extractor fans can be a route for cold draughts, too.
- CHIMNEY
If you have a chimney, it may be colder than the adjacent wall as the warm air inside it will tend to rise, the ‘stack effect’. The chimney may also be the source of draughts.
- FLOOR
If you have a suspended floor, cold air should blow across underneath it to prevent rot. But check for draughts coming up through floorboards and round the edge of the room under skirting boards .
- ROOF Loft hatch
Heat can be lost through the hatch in two ways: by draughts round the edge, and by conduction through the material of the hatch. Both are worth fixing
- ROOF Loft insulation
If you have access to your loft, look for heat loss through gaps between the insulation, including areas where the insulation may have been cut away over recessed halogen lights (recessed LED lights, being cool, are permitted to be covered by insulation).
Also check around ceiling light fittings – hot air will rise through any gaps.
The heating system
The thermal imaging camera can show local hot or cold spots in the heating system itself, which could indicate problems. Or it can show where heat is being wasted through gaps or lack of insulation.
Here is a checklist of places/items that you may need to test
- Boiler modern boilers are well insulated, but the pipes to and from the boiler need to be insulated too.
- Central heating pipes How effective is your pipe lagging? Does any heat escape through gaps?
- Hot water tank (if fitted) and pipes connecting it to the boiler. How effective is the lagging round the tank?
- Radiators Radiators will inevitably be warmest at the top, but uneven heat distribution could be due to air or sludge in the radiator.
Outside the house
Look for warm or hot patches.
A good time to use the camera outside is early morning when it is likely to have that ideal minimum 10℃ difference. If the heating is on, any significant heat losses will show clearly round doors and windows, the roof including any roofs to bay windows, and the integral garage if you have one.
When outside, we have found it worth exploring whether different colour palettes show heat differences more clearly (see Colour palette icon, above).
Sunshine warms the house wall, so there is nothing to be learned from using the camera outside when the sun is out. It is a good idea to keep a record of the temperature difference, then you can coordinate that with the time of photo, which is recorded with the photo itself.
It may be difficult to get far enough away from the house to capture the whole wall. If it is still dark when you are testing, saved images will not include a worthwhile light image so check you will be able to recognise the thermal image later.
What next?
Have fun exploring your house. Do spend time thinking about your findings and preferably discuss them with a knowledgeable person or professional before spending large amounts of time or money.
There are many reliable websites the provide information on reducing heat loss, and on whether you might qualify for a grant; these are just a few.
Community Energy Plus – www.cep.org.uk
Energy Saving Trust – https://energysavingtrust.org.uk/energy-at-home/
Which’s website has many pages of information – https://www.which.co.uk/l/heating-energy-and-air-treatment
The TrustMark website lists local professionals who apply good standards of practice http://www.trustmark.org.uk
Some basic principles:
- On average, half the heat loss from a house is from draughts, so tackle these first
- But be sure to ventilate any areas where steam or water vapour form – bathing, showering, cooking, drying clothes, sleeping
- Insulation needs doing properly, which can be expensive. But insulating the roof space can be cheap and pay for itself very quickly.
- Double glazing is also extremely effective at preventing heat loss.
- Ensuring external doors are well sealed and well insulated is also basic.
SEA would welcome feedback about your experiences with the camera,
and suggestions for improving any aspect of this scheme including this website